반응형
# 스프링 핵심 원리 기본편
# IoC, DI, 그리고 컨테이너
## 제어의 역전 (IoC : Inversion of Control)
- 기존 프로그램은 클라이언트 구현 객체가 스스로 필요한 서버 구현 객체를 생성하고, 실행했다. 한마디로 구현 객체가 프로그램의 제어 흐름을 스스로 조종했다. 개발자 입장에서는 자연스러운 흐름이다.
- 반면에 AppConfig가 등장한 이후에 구현 객체는 자신의 로직을 실행하는 역할만 담당한다. 프로그램의 제어 흐름은 이제 AppConfig가 가져간다. 예를 들어 OrderServiceImpl은 필요한 인터페이스들을 호출하지만 어떤 구현 객체들이 실행될지 모른다.
- 프로그램에 대한 제어 흐름에 대한 권한은 모두 AppConfig가 가지고 있다. 심지어 OrderServiceImpl도 AppConfig가 생성한다. 그리고 AppConfig는 OrderServiceImpl이 아닌 OrderService 인터페이스의 다른 구현 객체를 생성하고 실행할 수 도 있다. 그런 사실도 모른체 OrderServiceImpl은 묵묵히 자신의 로직을실행할 뿐이다.
- 프로그램의 제어 흐름을 직접 제어하는 것이 아니라, 외부에서 관리하는 것을 "제어의 역전(IoC)"라고 한다,
- 프레임워크 vs 라이브러리
프레임워크가 내가 작성한 코드를 제어하고, 대신 실행하면 그것은 프레임워크가 맞다. (JUnit)

반면 내가 작성한 코드가 직접 제어의 흐름을 담당한다면 그것은 프레임워크가 아니라 라이브러리이다.
## 의존관계 주입 (DI : Dependency Injection)
- OrderServiceImpl은 DiscountPolicy 인터페이스에 의존한다. 실제 어떤 구현 객체가 사용될지는 모른다.
- 의존관계는 '정적인 클래스 의존 관계'와, '실행 시점에 결정되는 동적인 객체(인스턴스) 의존 관계' 둘을 분리해서 생각해야 한다.
- 정적인 클래스 의존관계
클래스가 사용하는 import 코드만 보고 의존관계를 쉽게 판단할 수 있다.

정적인 의존관계는 애플리케이션을 실행하지 않아도 분석할 수 있다.

OrderServiceImpl은 MemberRepository, DiscountPolicy에 의존한다는 것을 알 수 있다.

그런데 이러한 클래스 의존관계 만으로는 실제 어떤 객체가 OrderServiceImpl에 주입될지 알 수 없다.- 클래스 다이어그램

- 동적인 객체 인스턴스 의존 관계
- 애플리케이션 실행 시점에 실제 생성된 객체 인스턴스의 참조가 연결된 의존 관계다.
- 객체 다이어그램

- 애플리케이션 실행 시점(런타임)에 외부에서 실제 구현 객체를 생성하고 클라이언트에 전달해서 클라이언트와 서버의 실제 의존관계가 연결 되는 것을 의존관계 주입이라고 한다.
- 객체 인스턴스를 생성하고, 그 참조값을 전달해서 연결된다.
- 의존관계 주입을 사용하면 클라이언트 코드를 변경하지 않고, 클라이언트가 호출하는 대상의 타입 인스턴스를 변경할 수 있다.
- 의존관계 주입을 사용하면 정적인 클래스 의존관계를 변경하지 않고, 동적인 객체 인스턴스 의존관계를 쉽게 변경할 수 있다.
## IoC 컨테이너, DI 컨테이너
- AppConfig 처럼 객체를 생성하고 관리하면서 의존관계를 연결해 주는 것을 IoC 컨테이너 또는 DI 컨테이너 라고 한다.
- 의존관계 주입에 초점을 맞추어 최근에는 주로 DI 컨테이너라고 한다. 또는 어샘블러, 오브젝트 팩토리 등으로 불리기도 한다.
# 스프링으로 전환하기
- AppConfig 스프링 기반으로 변경
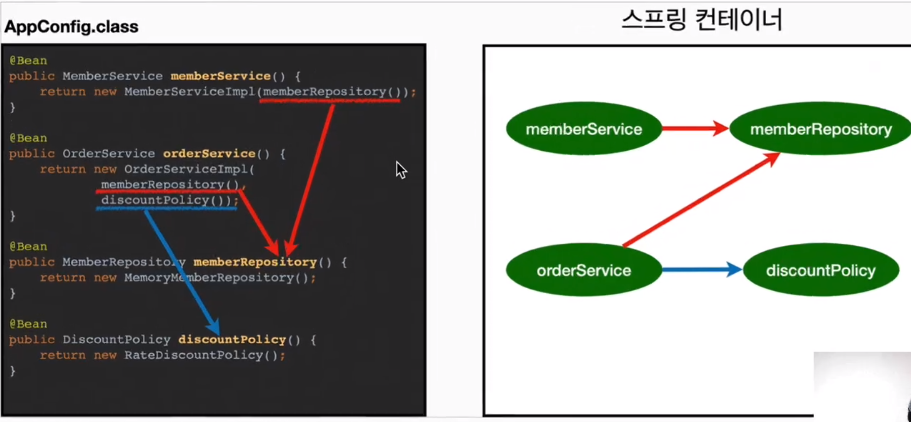
## 스프링 컨테이너
- AppConfig
package hello.core;

import hello.core.discount.DiscountPolicy;
import hello.core.discount.FixDiscountPolicy;
import hello.core.discount.RateDiscountPolicy;
import hello.core.member.MemberRepository;
import hello.core.member.MemberService;
import hello.core.member.MemberServiceImpl;
import hello.core.member.MemoryMemberRepository;
import hello.core.order.OrderService;
import hello.core.order.OrderServiceImpl;
import org.springframework.context.annotation.Bean;
import org.springframework.context.annotation.Configuration;

@Configuration
public class AppConfig {

    @Bean
    public MemberService memberService() {
        return new MemberServiceImpl(memberRepository());
    }

    @Bean
    public MemberRepository memberRepository() {
        return new MemoryMemberRepository();
    }

    @Bean
    public OrderService orderService() {
        return new OrderServiceImpl(memberRepository(), discountPolicy());
    }

    @Bean
    public DiscountPolicy discountPolicy() {
        return new RateDiscountPolicy();
    }

}
- MemberApp
package hello.core;

import hello.core.member.Grade;
import hello.core.member.Member;
import hello.core.member.MemberService;
import hello.core.member.MemberServiceImpl;
import org.springframework.context.ApplicationContext;
import org.springframework.context.annotation.AnnotationConfigApplicationContext;

public class MemberApp {

    public static void main(String[] args) {
//        AppConfig appConfig = new AppConfig();
//        MemberService memberService = appConfig.memberService();

        ApplicationContext applicationContext = new AnnotationConfigApplicationContext(AppConfig.class);
        MemberService memberService = applicationContext.getBean("memberService", MemberService.class);

        Member member = new Member(1L, "MemberA", Grade.VIP);
        memberService.join(member);

        Member findMember = memberService.findMember(1L);
        System.out.println("new member = " + member.getName());
        System.out.println("find member = " + findMember.getName());
    }
}
- OrderApp
package hello.core;

import hello.core.member.Grade;
import hello.core.member.Member;
import hello.core.member.MemberService;
import hello.core.member.MemberServiceImpl;
import hello.core.order.Order;
import hello.core.order.OrderService;
import hello.core.order.OrderServiceImpl;
import org.springframework.context.ApplicationContext;
import org.springframework.context.annotation.AnnotationConfigApplicationContext;

public class OrderApp {
    public static void main(String[] args) {

//        AppConfig appConfig = new AppConfig();
//        MemberService memberService = appConfig.memberService();
//        OrderService orderService = appConfig.orderService();

        ApplicationContext applicationContext = new AnnotationConfigApplicationContext(AppConfig.class);

        MemberService memberService = applicationContext.getBean("memberService", MemberService.class);
        OrderService orderService = applicationContext.getBean("orderService", OrderService.class);

        Long memberId = 1L;
        Member member = new Member(memberId, "memberA", Grade.VIP);
        memberService.join(member);

        Order order = orderService.createOrder(memberId, "itemA", 10000);

        System.out.println("order : " + order);
    }
}
- ApplicationContext를 스프링 컨테이너라 한다.
- 기존에는 개발자가 AppConfig를 사용해서 직접 객체를 생성하고 DI를 했지만, 이제부터는 스프링 컨테이너를 통해 사용한다. (스프링 컨테이너)
- 스프링 컨테이너는 @Configuration이 붙은 AppConfig를 설정(구성)정보로 사용한다. 여기서 @Bean이라 적힌 메서드를 모두 호출해서 반환된 객체를 스프링 컨테이너에 등록한다. 이렇게 스프링 컨테이너에 등록된 객체를 스프링 빈이라고 한다. (@Configuration / @Bean)
- 스프링 빈은 @Bean이 붙은 메서드의 명을 스프링 빈의 이름으로 사용한다. ('memberService', 'orderService')
- 이전에는 개발자가 필요한 객체를 AppConfig를 사용해서 직접 조회했지만, 이제부터는 스프링 컨테이너를 통해 필요한 스프링 빈(객체)를 찾아야 한다. 스프링 빈은 applicationContext.getBean() 메서드를 사용해서 찾을 수 있다. (applicationContext.getBean)
- 기존에는 개발자가 직접 자바코드로 모든 것을 했다면 이제부터는 스프링 컨테이너에 객체를 스프링 빈으로 등록하고, 스프링 컨테이너에서 스프링 빈을 찾아서 사용하도록 변경되었다.
# 스프링 컨테이너 생성
## 스프링 컨테이너 생성과정
ApplicationContext applicationContext = new AnnotationConfigApplicationContext(AppConfig.class);- ApplicationContext를 스프링 컨테이너라고 한다.
- ApplicationContext는 인터페이스이다.
- 스프링 컨테이너는 XML을 기반으로 만들 수 있고, 애노테이션 기반의 자바 설정 클래스로 만들 수 있다.
- 직전에 AppConfig를 사용했던 방식이 애노테이션 기반의 자바 설정 클래스로 스프링 컨테이너를 만든 것이다.
- 자바 설정 클래스를 기반으로 스프링 컨테이너(ApplicationContext)를 만들어보자.
new AnnotationConfigApplicationContext(AppConfig.class);

이 클래스는 ApplicationContext 인터페이스의 구현체이다.- 참고 : 더 정확히 스프링 컨테이너를 부를 때 BeanFactory, ApplicationContext로 구분해서 이야기 한다. BeanFactory를 직접 사용하는 경우는 거의 없으므로 일반적으로 ApplicationContext를 스프링 컨테이너라고 한다.
## 스프링 컨테이너의 생성 과정
1. 스프링 컨테이너 생성

- new AnnotationConfigApplicationContext(AppConfig.class)
- 스프링 컨테이너를 생성할 때는 구성 정보를 지정해주어야 한다.
- 여기서는 AppConfig.class를 구성 정보로 지정했다.
2. 스프링 빈 등록

- 스프링 컨테이너는 파라미터로 넘어온 설정 클래스 정보를 사용해서 스프링 빈을 등록한다.
- 빈 이름
빈 이름은 메서드 이름을 사용한다.

빈 이름을 직접 부여할 수 도 있다.

@Bean(name="memberService2")- 주의 : 빈 이름은 항상 다른 이름을 부여해야 한다. 같은 이름을 부여하면, 다른 빈이 무시되거나, 기존 빈을 덮어버리거나 설정에 따라 오류가 발생한다.
3. 스프링 빈 의존관계 설정_준비

4. 스프링 빈 의존관계 설정_완료
- 스프링 컨테이너는 설정 정보를 참고해서 의존관계를 주입(DI)한다.
- 단순히 자바 코드를 호출하는 것 같지만, 차이가 있다.
- 참고 : 스프링은 빈을 생성하고, 의존관계를 주입하는 단계가 나누어져 있다. 그런데 이렇게 자바 코드로 스프링 빈을 등록하면 생성자를 호출하면서 의존관계 주입도 한번에 처리된다.
# 컨테이너에 등록된 모든 빈 조회
- 스프링 컨테이너에 실제 스프링 빈들이 잘 등 되었는지 확인
- ApplicationContextInfoTest
package hello.core.beanfind;

import hello.core.AppConfig;
import org.junit.jupiter.api.DisplayName;
import org.junit.jupiter.api.Test;
import org.springframework.beans.factory.config.BeanDefinition;
import org.springframework.context.annotation.AnnotationConfigApplicationContext;

class ApplicationContextInfoTest {

    AnnotationConfigApplicationContext ac = new AnnotationConfigApplicationContext(AppConfig.class);

    @Test
    @DisplayName("모든 빈 출력하기")
    void findAllBean() {
        String[] beanDefinitionNames = ac.getBeanDefinitionNames();
        for (String beanDefinitionName : beanDefinitionNames) {
            Object bean = ac.getBean(beanDefinitionName);
            System.out.println("name = " + beanDefinitionName + " object = " + bean);
        }
    }

    @Test
    @DisplayName("애플리케이션 빈 출력하기")
    void findApplicationBean() {
        String[] beanDefinitionNames = ac.getBeanDefinitionNames();
        for (String beanDefinitionName : beanDefinitionNames) {
            BeanDefinition beanDefinition = ac.getBeanDefinition((beanDefinitionName));

            //Role ROLE_APPLICATION: 직접 등록한 애플리케이션 빈
            //Role ROLE_INFRASTRUCTURE: 스프링이 내부에서 사용하는 빈
            if (beanDefinition.getRole() == BeanDefinition.ROLE_APPLICATION) {
                Object bean = ac.getBean(beanDefinitionName);
                System.out.println("name = " + beanDefinitionName + " object = " + bean);
            }
        }
    }

}
- 모든 빈 출력하기
실행하면 스프링에 등록된 모든 빈 정보를 출력할 수 있다.

ac.getBeanDefinitionNames() : 스프링에 등록된 모든 빈 이름을 조회한다.

ac.getBean() : 빈 이름으로 빈 객체(인스턴스)를 조회한다.- 애플리케이션 빈 출력하기
스프링이 내부에서 사용하는 빈은 제외하고, 내가 등록한 빈만 출력.

스프링이 내부에서 사용하는 빈은 getRole() 로 구분할 수 있다.

ROLE_APPLICATION : 일반적으로 사용자가 정의한 빈

ROLE_INFRASTRUCTURE : 스프링이 내부에서 사용하는 빈
출처 : 인프런 스프링 핵심 원리 기본편
반응형
'인프런 강의 학습 > 스프링 핵심 원리(기본편)' 카테고리의 다른 글
| 스프링 핵심 원리 기본편 10일차 (0) | 2021.02.03 |
|---|---|
| 스프링 핵심 원리 기본편 9일차 (0) | 2021.02.02 |
| 스프링 핵심 원리 기본편 7일차 (0) | 2021.01.31 |
| 스프링 핵심 원리 기본편 6일차 (0) | 2021.01.30 |
| 스프링 핵심 원리 기본편 5일차 (0) | 2021.01.28 |