반응형

# TypeScript

## 타입스크립트 시작하기

프로젝트 시작 방법 (라이브러리설치와 TSC)

  • getting-started 폴더 생성 > getting-started 폴더 하위에 index.ts 생성.
function sum(a: number, b: number): number {
    return a + b;
}

sum(10, 20);
  • 컴파일 (Compile) : ts 파일을 js 파일로 변환하는 작업.
  • index.ts 우클릭 > 터미널 열기.
  • node -v : node 설치 여부 확인
  • 라이브러리 설치 (노드 기반 타입스크립트 라이브러리 설치) : npm i typescript -g
  • ts 파일을 js 파일로 컴파일 (입력 시 index.js 생성됨) : tsc index.ts

타입 스크립트 설정 파일

  • getting-started 폴더 하위에 tsconfig.json 생성.
  • tsconfig.json에 key-value 형태로 입력.
{
    "compilerOptions": {
        "allowJs" : true,
        "checkJs" : true,    // @ts-check와 동일한 역할.
        "noImplicitAny" : true	// 타입 명시 옵션(any라도 명시되도록)
    }
}
 

TSConfig Reference - Docs on every TSConfig option

From allowJs to useDefineForClassFields the TSConfig reference includes information about all of the active compiler flags setting up a TypeScript project.

www.typescriptlang.org

타입스크립트 플레이그라운드


JavaScript With Syntax For Types.

TypeScript extends JavaScript by adding types to the language. TypeScript speeds up your development experience by catching errors and providing fixes before you even run your code.

www.typescriptlang.org

  • 왼쪽에 타입스크립트 코드 작성 시 오른쪽 화면에서 변환된 결과 확인 가능.


반응형
반응형

# TypeScript

## 개발환경 구성


GitHub - joshua1988/learn-typescript

Contribute to joshua1988/learn-typescript development by creating an account on GitHub.

github.com

  • Chrome
  • Visual Studio Code
  • Node.js LTS 버전 (v10.x 이상)
  • Git

리포지토리 클론 및 VSCode로 폴더 열기

  • 위 깃헙 접속하여 Clone, 원하는 폴더 위치에서 터미널 오픈(윈도우의 경우 cmd) 아래와 같이 입력하여 Clone 진행
C:\study>git clone https://github.com/joshua1988/learn-typescript.git
  • VS Code 실행 후 Clone 해온 폴더 드래그 앤 드랍으로 실행.

VS Code 플러그인 설치 및 구성

  • 왼쪽 플러그인(확장) 클릭하여 아래 플러그인 설치 진행.
  • 색 테마 : Night Owl
  • 파일 아이콘 테마 : Material Icon Theme
  • 문법 검사 : ESLint, TSLint
  • 실습 환경 보조 : Live Server
  • 기타 : Prettier, Project Manager, Auto Close Tag, GitLens, Atom Keymap, Jetbrains IDE Keymap 등

강의 교안


타입스크립트 핸드북


joshua1988.github.io

## 타입스크립트

  • 자바스크립트에 타입을 부여한 언어.
  • 자바스크립트와 다르게 블라우저에서 실행하기 위해 파일을 한번 변환해줘야 한다. (컴파일)

## 타입스크립트 사용 이유.

에러의 사전 방지

/**
 * @typedef {object} address
 * @property {string} street
 * @property {string} city
*/

/**
 * @typedef {object} User
 * @property {string} name
 * @property {string} email
 * @property {Address} address
*/

/**
 * @returns {Promise<User>}
 */
function fetchUser() {
  return axios.get(url);
}

fetchUser().then(function(response){
  response.address.cit;		// 에러 사전 방지.
})

코드 자동 완성 가이드.

function sum(a, b) {
    return a + b;
}

sum(10, 20);    // 30
sum(10, '20');  // 1020
  • 아래와 같이 입력 타입, 반환 타입 설정 가능.
  • 타입에 맞지 않는 값이 들어오는 경우 코드상에서 에러 표시 됨.
  • 타입에 따라 제공되는 api 자동완성 기능 사용 가능.
function add(a: number, b: number): number {
    return a + b;
}

var result = add(10, 20);
//add(10, '20');  // 정해진 타입이 아닌 경우, 코드상에서 에러 표시.

result.toLocaleString();    // 제공되는 타입에 따른 api 사용 가능.

 자바스크립트를 타입스크립트처럼 코딩하는 방법

// @ts-check

/**
 * @param {number} a 첫 번째 숫자
 * @param {number} b 두 번째 숫자
*/
function sum(a, b) {
    return a + b;
}

sum(10, 20);
sum(10, '20');  // @ts-check 설정 시 ts 사용하는 것 같은 효과 제공.
반응형
반응형

# 스프링 MVC 웹 페이지 만들기

## 프로젝트 생성.

  • Dependencies : Spring Web, Thymeleaf, Lombok
  • GENERATE 클릭 후 압축 해제 진행. 인텔리제이에서 File > open 클릭 후 압축해제한 폴더 내 build.gradle 선택하여 파일 열기.
  • Lombok : File > Settings > annotation processors 입력 후 Enable annotation processing 체크.
  • Gradle : File > Settings > Gradle 검색 후 Gradle에서 아래와 같이 설정.
Build and run using : IntelliJ IDEA
Run tests using : IntelliJ IDEA
  • 전체적인 설정 완료 후 main 실행해서 정상 작동하는지 확인.
  • Port 충돌날 경우 Run > Edit Configurations > Environment variables 에 아래와 같이 입력하여 Port 변경.
server.port=8082
 
  • 웰컴 페이지 추가 : resources > static에 index.html 추가.
<!DOCTYPE html>
<html>
<head>
    <meta charset="UTF-8">
    <title>Title</title>
</head>
<body>
<ul>
    <li>상품 관리
        <ul>
            <li><a href="/basic/items">상품 관리 - 기본</a></li>
        </ul>
    </li>
</ul>
</body>
</html>

## 요구사항 분석

  • 상품 도메인 모델 : 상품 ID, 상품명, 가격, 수량,
  • 상품 관리 기능 : 상품 목록, 상품 상세, 상품 등록, 상품 수정
  • 필요 화면 : 상품 목록, 상품 상세, 상품 등록 폼, 상품 수정 폼

서비스 제공 흐름

## 상품 도메인 개발

item 상품 객체 생성.

package hello.itemservice.domain.item;

import lombok.Data;
import lombok.Getter;
import lombok.Setter;

//@Getter @Setter
@Data
public class Item {

    private Long id;
    private String itemName;
    private Integer price;
    private Integer quantity;

    public Item() {
    }

    public Item(String itemName, Integer price, Integer quantity) {
        this.itemName = itemName;
        this.price = price;
        this.quantity = quantity;
    }
}
  • @Data 의 경우 주의해서 사용 가능하면 @Getter, @Setter 사용.

ItemRepository 상품 저장소.

package hello.itemservice.domain.item;

import org.springframework.stereotype.Repository;

import java.util.ArrayList;
import java.util.HashMap;
import java.util.List;
import java.util.Map;

@Repository
public class ItemRepository {

    // 실무에서는 동시 접근과 관련하여 HashMap 보다는 ConcurrentHashMap사용.
    private static final Map<Long, Item> store = new HashMap<>();   // static
    private static long sequence = 0L;  // static

    public Item save(Item item) {
        item.setId(++sequence);
        store.put(item.getId(), item);

        return item;
    }

    public Item findById(Long id) {
        return store.get(id);
    }

    public List<Item> findAll() {
        return new ArrayList<>(store.values());
    }

    public void update(Long itemId, Item updateParam) {
        Item findItem = findById(itemId);
        findItem.setItemName(updateParam.getItemName());
        findItem.setPrice(updateParam.getPrice());
        findItem.setQuantity(updateParam.getQuantity());
    }

    public void clearStore() {
        store.clear();
    }
}

ItemRepositoryTest.

package hello.itemservice.domain.item;

import org.assertj.core.api.Assertions;
import org.junit.jupiter.api.AfterEach;
import org.junit.jupiter.api.Test;

import java.util.List;

import static org.assertj.core.api.Assertions.assertThat;

class ItemRepositoryTest {

    ItemRepository itemRepository = new ItemRepository();

    @AfterEach
    void afterEach() {
        itemRepository.clearStore();
    }

    @Test
    void save() {
        // given
        Item item = new Item("itemA", 10000, 10);

        // when
        Item saveItem = itemRepository.save(item);

        // then
        Item findItem = itemRepository.findById(item.getId());
        assertThat(findItem).isEqualTo(saveItem);
    }

    @Test
    void findAll() {
        // given
        Item item1 = new Item("item1", 10000, 10);
        Item item2 = new Item("item2", 20000, 50);
        itemRepository.save(item1);
        itemRepository.save(item2);

        // when
        List<Item> result = itemRepository.findAll();

        // then
        assertThat(result.size()).isEqualTo(2);
        assertThat(result).contains(item1, item2);
    }

    @Test
    void updateItem() {
        // given
        Item item = new Item("item1", 10000, 10);

        Item savedItem = itemRepository.save(item);
        Long itemId = savedItem.getId();

        // when
        Item updateParam = new Item("item2", 20000, 30);
        itemRepository.update(itemId, updateParam);

        // then
        Item findItem = itemRepository.findById(itemId);
        assertThat(findItem.getItemName()).isEqualTo(updateParam.getItemName());
        assertThat(findItem.getPrice()).isEqualTo(updateParam.getPrice());
        assertThat(findItem.getQuantity()).isEqualTo(updateParam.getQuantity());
    }
}

## 상품 서비스 HTML

부트스트랩 


Bootstrap

The most popular HTML, CSS, and JS library in the world.

getbootstrap.com


Download

Download Bootstrap to get the compiled CSS and JavaScript, source code, or include it with your favorite package managers like npm, RubyGems, and more.

getbootstrap.com

이동: https://getbootstrap.com/docs/5.0/getting-started/download/
Compiled CSS and JS 항목을 다운로드.

압축 출고 bootstrap.min.css 를 복사해 아래 폴더에 추가.
resources/static/css/bootstrap.min.css

HTML, CSS

  • /resources/static/css/bootstrap.min.css 부트스트랩 다운로드해서 추가.
  • /resources/static/html/items.html
<!DOCTYPE HTML>
<html>
<head>
    <meta charset="utf-8">
    <link href="../css/bootstrap.min.css" rel="stylesheet">
</head>
<body>
<div class="container" style="max-width: 600px">
    <div class="py-5 text-center">
        <h2>상품 목록</h2>
    </div>
    <div class="row">
        <div class="col">
            <button class="btn btn-primary float-end"
                    onclick="location.href='addForm.html'" type="button">상품
                등록</button>
        </div>
    </div>
    <hr class="my-4">
    <div>
        <table class="table">
            <thead>
            <tr>
                <th>ID</th>
                <th>상품명</th>
                <th>가격</th>
                <th>수량</th>
            </tr>
            </thead>
            <tbody>
            <tr>
                <td><a href="item.html">1</a></td>
                <td><a href="item.html">테스트 상품1</a></td>
                <td>10000</td>
                <td>10</td>
            </tr>
            <tr>
                <td><a href="item.html">2</a></td>
                <td><a href="item.html">테스트 상품2</a></td>
                <td>20000</td>
                <td>20</td>
            </tr>
            </tbody>
        </table>
    </div>
</div> <!-- /container -->
</body>
</html>
  • /resources/static/html/item.html
<!DOCTYPE HTML>
<html>
<head>
    <meta charset="utf-8">
    <link href="../css/bootstrap.min.css" rel="stylesheet">
    <style>
 .container {
 max-width: 560px;
 }
 </style>
</head>
<body>
<div class="container">
    <div class="py-5 text-center">
        <h2>상품 상세</h2>
    </div>
    <div>
        <label for="itemId">상품 ID</label>
        <input type="text" id="itemId" name="itemId" class="form-control"
               value="1" readonly>
    </div>
    <div>
        <label for="itemName">상품명</label>
        <input type="text" id="itemName" name="itemName" class="form-control"
               value="상품A" readonly>
    </div>
    <div>
        <label for="price">가격</label>
        <input type="text" id="price" name="price" class="form-control"
               value="10000" readonly>
    </div>
    <div>
        <label for="quantity">수량</label>
        <input type="text" id="quantity" name="quantity" class="form-control"
               value="10" readonly>
    </div>
    <hr class="my-4">
    <div class="row">
        <div class="col">
            <button class="w-100 btn btn-primary btn-lg"
                    onclick="location.href='editForm.html'" type="button">상품 수정</button>
        </div>
        <div class="col">
            <button class="w-100 btn btn-secondary btn-lg"
                    onclick="location.href='items.html'" type="button">목록으로</button>
        </div>
    </div>
</div> <!-- /container -->
</body>
</html>
  • /resources/static/html/addForm.html
<!DOCTYPE HTML>
<html>
<head>
    <meta charset="utf-8">
    <link href="../css/bootstrap.min.css" rel="stylesheet">
    <style>
 .container {
 max-width: 560px;
 }
 </style>
</head>
<body>
<div class="container">
    <div class="py-5 text-center">
        <h2>상품 등록 폼</h2>
    </div>
    <h4 class="mb-3">상품 입력</h4>
    <form action="item.html" method="post">
        <div>
            <label for="itemName">상품명</label>
            <input type="text" id="itemName" name="itemName" class="formcontrol" placeholder="이름을 입력하세요">
        </div>
        <div>
            <label for="price">가격</label>
            <input type="text" id="price" name="price" class="form-control"
                   placeholder="가격을 입력하세요">
        </div>
        <div>
            <label for="quantity">수량</label>
            <input type="text" id="quantity" name="quantity" class="formcontrol" placeholder="수량을 입력하세요">
        </div>
        <hr class="my-4">
        <div class="row">
            <div class="col">
                <button class="w-100 btn btn-primary btn-lg" type="submit">상품
                    등록</button>
            </div>
            <div class="col">
                <button class="w-100 btn btn-secondary btn-lg"
                        onclick="location.href='items.html'" type="button">취소</button>
            </div>
        </div>
    </form>
</div> <!-- /container -->
</body>
</html>
  • /resources/static/html/editForm.html
<!DOCTYPE HTML>
<html>
<head>
    <meta charset="utf-8">
    <link href="../css/bootstrap.min.css" rel="stylesheet">
    <style>
 .container {
 max-width: 560px;
 }
 </style>
</head>
<body>
<div class="container">
    <div class="py-5 text-center">
        <h2>상품 수정 폼</h2>
    </div>
    <form action="item.html" method="post">
        <div>
            <label for="id">상품 ID</label>
            <input type="text" id="id" name="id" class="form-control" value="1"
                   readonly>
        </div>
        <div>
            <label for="itemName">상품명</label>
            <input type="text" id="itemName" name="itemName" class="formcontrol" value="상품A">
        </div>
        <div>
            <label for="price">가격</label>
            <input type="text" id="price" name="price" class="form-control"
                   value="10000">
        </div>
        <div>
            <label for="quantity">수량</label>
            <input type="text" id="quantity" name="quantity" class="formcontrol" value="10">
        </div>
        <hr class="my-4">
        <div class="row">
            <div class="col">
                <button class="w-100 btn btn-primary btn-lg" type="submit">저장
                </button>
            </div>
            <div class="col">
                <button class="w-100 btn btn-secondary btn-lg"
                        onclick="location.href='item.html'" type="button">취소</button>
            </div>
        </div>
    </form>
</div> <!-- /container -->
</body>
</html>

## 상품목록_타임리프 사용

  • 컨트롤러와 뷰 템플릿 개발.

BasicItemController

package hello.itemservice.web.basic;

import hello.itemservice.domain.item.Item;
import hello.itemservice.domain.item.ItemRepository;
import lombok.RequiredArgsConstructor;
import org.springframework.beans.factory.annotation.Autowired;
import org.springframework.stereotype.Controller;
import org.springframework.ui.Model;
import org.springframework.web.bind.annotation.GetMapping;
import org.springframework.web.bind.annotation.RequestMapping;

import javax.annotation.PostConstruct;
import java.util.List;

@Controller
@RequestMapping("/basic/items")
@RequiredArgsConstructor
public class BasicItemController {

    private final ItemRepository itemRepository;

    @GetMapping
    public String items(Model model) {
        List<Item> items = itemRepository.findAll();
        model.addAttribute("items", items);
        return "basic/items";
    }

    /**
     * 테스트용 데이터 추가.
     * */
    @PostConstruct
    public void init() {
        itemRepository.save(new Item("itemA", 10000, 10));
        itemRepository.save(new Item("itemB", 20000, 20));
    }
}
  • @RequiredArgsConstructor : final 붙은 멤버변수만 사용, 생성자를 자동으로 만들어준다.

items.html

  • 아래 경로에 추가.
/resources/templates/basic/items.html
  • 속성 변경 : 기존 css href를 th:href로 변경.
<link th:href="@{/css/bootstrap.min.css}"
        href="../css/bootstrap.min.css" rel="stylesheet">
  • 속성변경 : 기존 상품 등록 폼 이동 onclick 변경
<button class="btn btn-primary float-end"
        onclick="location.href='addForm.html'"
        th:onclick="|location.href='@{/basic/items/add}'|"
        type="button">상품
    등록</button>
  •  반복 출력 : th:each 사용. 
<tr th:each="item : ${items}">
    <td><a href="item.html" th:href="@{/basic/items/{itemId}(itemId=${item.id})}" th:text="${item.id}">회원ID</a></td>
    <td><a href="item.html" th:href="@{/basic/items/{itemId}(itemId=${item.id})}" th:text="${item.itemName}">상품명</a></td>
    <td th:text="${item.price}">10000</td>
    <td th:text="${item.quantity}">10</td>
</tr>
<!DOCTYPE HTML>
<html xmlns:th="http://www.thymeleaf.org">
<head>
    <meta charset="utf-8">
    <link th:href="@{/css/bootstrap.min.css}"
            href="../css/bootstrap.min.css" rel="stylesheet">
</head>
<body>
<div class="container" style="max-width: 600px">
    <div class="py-5 text-center">
        <h2>상품 목록</h2>
    </div>
    <div class="row">
        <div class="col">
            <button class="btn btn-primary float-end"
                    onclick="location.href='addForm.html'"
                    th:onclick="|location.href='@{/basic/items/add}'|"
                    type="button">상품
                등록</button>
        </div>
    </div>
    <hr class="my-4">
    <div>
        <table class="table">
            <thead>
            <tr>
                <th>ID</th>
                <th>상품명</th>
                <th>가격</th>
                <th>수량</th>
            </tr>
            </thead>
            <tbody>
            <tr th:each="item : ${items}">
                <td><a href="item.html" th:href="@{/basic/items/{itemId}(itemId=${item.id})}" th:text="${item.id}">회원ID</a></td>
                <td><a href="item.html" th:href="@{|/basic/items/${item.id}|}" th:text="${item.itemName}">상품명</a></td>
                <td th:text="${item.price}">10000</td>
                <td th:text="${item.quantity}">10</td>
            </tr>
            </tbody>
        </table>
    </div>
</div> <!-- /container -->
</body>
</html>

타임리프

  • 타임리프 사용 선언 : 타임리프 사용을 위해 아래와 같이 선언.
<html xmlns:th="http://www.thymeleaf.org">

속성 변경 : th:href

  • href="value1"을 th:href="value2"의 값으로 변경.
  • 타임리프 뷰 템플릿을 거치면서 원래 값을 th:xxx 로 변경한다. 만약 값이 없으면 새로 생성한다.
<link th:href="@{/css/bootstrap.min.css}"
        href="../css/bootstrap.min.css" rel="stylesheet">

속성 변경 : th:onclick

<button class="btn btn-primary float-end"
        onclick="location.href='addForm.html'"
        th:onclick="|location.href='@{/basic/items/add}'|"
        type="button">상품
    등록</button>

타임리프의 핵심

  • th:xxx가 붙은 부분은 서버사이드에서랜더링 되고, 기존 것을 대체한다. th:xxx가 없으면 기존 html의 xxx 속성이 그대로 사용된다.
  • HTML파일을 직접 열었을 때, th:xxx가 있어도 웹 브라우저는 th: 속성을 알지 못하므로 무시. (HTML 파일 보기를 유지하면서도 템플릿 기능도 할 수 있다.)

URL 링크 표현식 : @{ ... }

  • @{ } : 타임리프는 URL 링크를 사용하는 경우 @{ } 를 사용. (=URL 링크 표현식)
  • URL 링크 표현식을 사용하면 서블릿 컨텍스트를 자동으로 포함.
th:href="@{/css/bootstrap.min.css}"

URL 링크 표현식2 : @ { ... }

  • 상품 id 선택 시 링크.
<td><a href="item.html" th:href="@{/basic/items/{itemId}(itemId=${item.id})}" th:text="${item.id}">회원ID</a></td>
  • URL 경로 표현식을 이용하여 경로를 템플릿처럼 편리하게 사용.
  • 경로 변수 ( {item.id} ) 뿐만 아니라 쿼리 파라미터도 생성한다.
th:href="@{/basic/items/{itemId}(itemId=${item.id}, query='test')}" th:text="${item.id}"

=>
생성링크 : http://localhost:8080/basic/items/1?query=test

리터럴 대체 : | ... |

  • 타임리프에서 문자와 표현식 등은 분리되어 있기 때문에 더해서 사용해야 함.
<span th:text="'Welcome to our apllication, ' + ${user.name} + '!'">
  • 아래와 같이 리터럴 대체 문법 사용 시 더하기 없이 편리하게 사용 가능.
<span th:text="|Welcome to our apllication, ${user.name} !|">

반복 출력 : th:each

<tr th:each="item : ${items}">
  • 반복은 th:each 사용, 이렇게 하면 모델에 포함된 items 컬렉션 데이터가 item 변수에 하나씩 포함, 반복문 안에서 item 변수 사용 가능.
  • 컬렉션의 수 만큼 <tr> .. <tr>이 하위 태그를 포함해서 생성.
<tr th:each="item : ${items}">
    <td><a href="item.html" th:href="@{/basic/items/{itemId}(itemId=${item.id})}" th:text="${item.id}">회원ID</a></td>
    <td><a href="item.html" th:href="@{/basic/items/{itemId}(itemId=${item.id})}" th:text="${item.itemName}">상품명</a></td>
    <td th:text="${item.price}">10000</td>
    <td th:text="${item.quantity}">10</td>
</tr>

변수 표현식 : ${ ... }

<td th:text="${item.price}">10000</td>
  • 모델에 포함된 값이나, 타임리프 변수로 선언한 값을 조회.
  • 프로퍼티 접근법을 사용 ( item.getPrice() )

내용 변경 : th:text

<td th:text="${item.price}">10000</td>
  • 내용의 값을 th:text의 값으로 변경. 위 코드에서는 10000을 ${item.price} 값으로 변경.

##  상품 상세

BasicItemController : item 추가.

package hello.itemservice.web.basic;

import hello.itemservice.domain.item.Item;
import hello.itemservice.domain.item.ItemRepository;
import lombok.RequiredArgsConstructor;
import org.springframework.beans.factory.annotation.Autowired;
import org.springframework.stereotype.Controller;
import org.springframework.ui.Model;
import org.springframework.web.bind.annotation.GetMapping;
import org.springframework.web.bind.annotation.PathVariable;
import org.springframework.web.bind.annotation.RequestMapping;

import javax.annotation.PostConstruct;
import java.util.List;

@Controller
@RequestMapping("/basic/items")
@RequiredArgsConstructor
public class BasicItemController {

    private final ItemRepository itemRepository;

    @GetMapping
    public String items(Model model) {
        List<Item> items = itemRepository.findAll();
        model.addAttribute("items", items);
        return "basic/items";
    }

    @GetMapping("/{itemId}")
    public String item(@PathVariable long itemId, Model model) {
        Item item = itemRepository.findById(itemId);
        model.addAttribute("item", item);
        return "basic/item";
    }

    /**
     * 테스트용 데이터 추가.
     * */
    @PostConstruct
    public void init() {
        itemRepository.save(new Item("itemA", 10000, 10));
        itemRepository.save(new Item("itemB", 20000, 20));
    }
}

item.html

<!DOCTYPE HTML>
<html xmlns:th="http://www.thymeleaf.org">
<head>
    <meta charset="utf-8">
    <link th:href="@{/css/bootstrap.min.css}"
          href="../css/bootstrap.min.css" rel="stylesheet">
    <style>
        .container {
            max-width: 560px;
        }
    </style>
</head>
<body>
<div class="container">
    <div class="py-5 text-center">
        <h2>상품 상세</h2>
    </div>
    <div>
        <label for="itemId">상품 ID</label>
        <input type="text" id="itemId" name="itemId" class="form-control" value="1" th:value="${item.id}" readonly>
    </div>
    <div>
        <label for="itemName">상품명</label>
        <input type="text" id="itemName" name="itemName" class="form-control" value="상품A" th:value="${item.itemName}" readonly>
    </div>
    <div>
        <label for="price">가격</label>
        <input type="text" id="price" name="price" class="form-control" value="10000" th:value="${item.price}" readonly>
    </div>
    <div>
        <label for="quantity">수량</label>
        <input type="text" id="quantity" name="quantity" class="form-control" value="10" th:value="${item.quantity}" readonly>
    </div>
    <hr class="my-4">
    <div class="row">
        <div class="col">
            <button class="w-100 btn btn-primary btn-lg"
                    onclick="location.href='editForm.html'"
                    th:onclick="|location.href='@{/basic/items/{itemId}/edit(itemId=${item.id})}'|"
                    type="button">상품 수정</button>
        </div>
        <div class="col">
            <button class="w-100 btn btn-secondary btn-lg"
                    onclick="location.href='items.html'"
                    th:onclick="|location.href='@{/basic/items}'|"
                    type="button">목록으로</button>
        </div>
    </div>
</div> <!-- /container -->
</body>
</html>

## 상품 등록 폼

BasicItemController : addForm 추가

package hello.itemservice.web.basic;

import hello.itemservice.domain.item.Item;
import hello.itemservice.domain.item.ItemRepository;
import lombok.RequiredArgsConstructor;
import org.springframework.beans.factory.annotation.Autowired;
import org.springframework.stereotype.Controller;
import org.springframework.ui.Model;
import org.springframework.web.bind.annotation.GetMapping;
import org.springframework.web.bind.annotation.PathVariable;
import org.springframework.web.bind.annotation.RequestMapping;

import javax.annotation.PostConstruct;
import java.util.List;

@Controller
@RequestMapping("/basic/items")
@RequiredArgsConstructor
public class BasicItemController {

    private final ItemRepository itemRepository;

    @GetMapping
    public String items(Model model) {
        List<Item> items = itemRepository.findAll();
        model.addAttribute("items", items);
        return "basic/items";
    }

    @GetMapping("/{itemId}")
    public String item(@PathVariable long itemId, Model model) {
        Item item = itemRepository.findById(itemId);
        model.addAttribute("item", item);
        return "basic/item";
    }

    @GetMapping("/add")
    public String addForm() {
        return "basic/addForm";
    }

    /**
     * 테스트용 데이터 추가.
     * */
    @PostConstruct
    public void init() {
        itemRepository.save(new Item("itemA", 10000, 10));
        itemRepository.save(new Item("itemB", 20000, 20));
    }
}

addForm.html

<!DOCTYPE HTML>
<html xmlns:th="http://www.thymeleaf.org">
<head>
    <meta charset="utf-8">
    <link th:href="@{/css/bootstrap.min.css}"
          href="../css/bootstrap.min.css" rel="stylesheet">
    <style>
        .container {
            max-width: 560px;
        }
    </style>
</head>
<body>

<div class="container">
    <div class="py-5 text-center">
        <h2>상품 등록 폼</h2>
    </div>
    <h4 class="mb-3">상품 입력</h4>
    <form action="item.html" th:action method="post">
        <div>
            <label for="itemName">상품명</label>
            <input type="text" id="itemName" name="itemName" class="formcontrol" placeholder="이름을 입력하세요">
        </div>
        <div>
            <label for="price">가격</label>
            <input type="text" id="price" name="price" class="form-control"
                   placeholder="가격을 입력하세요">
        </div>
        <div>
            <label for="quantity">수량</label>
            <input type="text" id="quantity" name="quantity" class="formcontrol" placeholder="수량을 입력하세요">
        </div>
        <hr class="my-4">
        <div class="row">
            <div class="col">
                <button class="w-100 btn btn-primary btn-lg"
                        type="submit">상품등록</button>
            </div>
            <div class="col">
                <button class="w-100 btn btn-secondary btn-lg"
                        onclick="location.href='items.html'"
                        th:onclick="|location.href='@{/basic/items}'|"
                        type="button">취소</button>
            </div>
        </div>
    </form>
</div> <!-- /container -->
</body>
</html>

속성 변경 : th:action

  • HTML form에서 action 에 값이 없으면 현재 URL에 데이터를 전송한다.
  • 상품 등록 폼의 URL과 실제 상품 등록을 처리하는 URL을 동일하게 맞추고 HTTP 메서드로 두 기능을 구분.
상품 등록 폼 : GET /basic/items/add

상품 등록 처리 : POST /basic/items/add
  • 이렇게 하면 하나의 URL로 등록 폼과, 등록 처리를 깔끔하게 처리할 수 있다.

## 상품 등록 처리_@ModelAttribute

  • POST - HTML Form
content-type: application/x-www-form-urlencoded

메시지 바디에 쿼리 파리미터 형식으로 전달 itemName=itemA&price=10000&quantity=10

예) 회원 가입, 상품 주문, HTML Form 사용
  • 요청 파라미터 형식을 처리해야 하므로 @RequestParam 사용.

상품 등록 처리_@RequestParam

addItemV1 - BasicItemController에 추가

@PostMapping("/add")
public String addItemV1(@RequestParam String itemName,
                   @RequestParam int price,
                   @RequestParam Integer quantity,
                   Model model) {

    Item item = new Item();
    item.setItemName(itemName);
    item.setPrice(price);
    item.setQuantity(quantity);

    itemRepository.save(item);

    model.addAttribute("item", item);

    return "basic/item";
}

addItemV2 - BasicItemController에 추가

@PostMapping("/add")
    public String addItemV2(@ModelAttribute("item") Item item) {

        itemRepository.save(item);
//        model.addAttribute("item", item);     // 자동 추가, 생략 가능

        return "basic/item";
    }

@ModelAttribute 중요 기능

1. 요청 파라미터 처리

  • @ModelAttribute 는 Item 객체를 생성, 요청 파라미터의 값을 프로퍼티 접근법(setXxx)으로 입력해준다.

2. Model 추가

  • 모델(Model)에 @ModelAttribute 로 지정한 객체를 자동으로 넣어준다.
  • 위 코드에서 model.addAttribute("item", item) 가 주석처리 되어 있어도 잘 동작.
  • 모델에 데이터를 담을 때는 이름이 필요. 이름은 @ModelAttribute 에 지정한 name(value) 속성을 사용.
  • 만약 다음과 같이 @ModelAttribute 의 이름을 다르게 지정하면 다른 이름으로 모델에 포함된다.
  • @ModelAttribute("hello") Item item -> 이름을 hello 로 지정
  • model.addAttribute("hello", item); -> 모델에 hello 이름으로 저장

addItemV3 - BasicItemController에 추가

@PostMapping("/add")
    public String addItemV3(@ModelAttribute Item item) {
        // @ModelAttribute("item")에서 ("item") 생략 시 Item -> item이 modelAttribute 담기게 됨.
        itemRepository.save(item);
//        model.addAttribute("item", item);     // 자동 추가, 생략 가능

        return "basic/item";
    }
  • @ModelAttribute 의 이름을 생략할 수 있다. (@ModelAttribute 의 이름을 생략 시 모델에 저장될 때 클래스명을 사용. 이때 클래스의 첫글자만 소문자로 변경해서 등록한다.)
@ModelAttribute 클래스명 모델에 자동 추가되는 이름
Item -> item
HelloWorld -> helloWorld

addItemV4 - BasicItemController에 추가

@PostMapping("/add")
    public String addItemV4(Item item) {
        itemRepository.save(item);
//        model.addAttribute("item", item);     // 자동 추가, 생략 가능
        return "basic/item";
    }
  • @ModelAttribute 자체도 생략가능.
  • 대상 객체는 모델에 자동 등록.
  • 나머지 사항은 기존과 동일하다.

## 상품 수정.

BasicItemController : editForm 추가.

@GetMapping("/{itemId}/edit")
public String editForm(@PathVariable Long itemId, Model model) {
    Item item = itemRepository.findById(itemId);
    model.addAttribute("item", item);
    return "basic/editForm";
}

@PostMapping("/{itemId}/edit")
public String edit(@PathVariable Long itemId, @ModelAttribute Item item) {
    itemRepository.update(itemId, item);
    return "redirect:/basic/items/{itemId}";
}
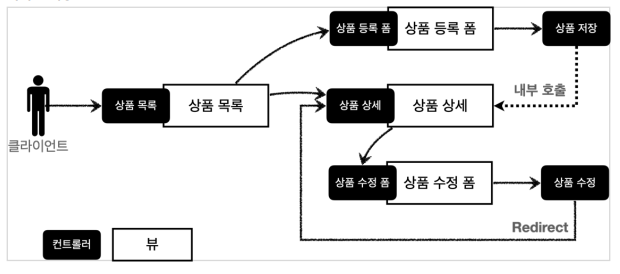
  • 상품 수정은 상품 등록과 전체 프로세스가 유사.
GET /items/{itemId}/edit : 상품 수정 폼
POST /items/{itemId}/edit : 상품 수정 처리

리다이렉트

  • 상품 수정은 마지막에 뷰 템플릿을 호출하는 대신 상품 상세 화면으로 이동하도록 리다이렉트를 호출.
  • 스프링은 redirect:/... 으로 편리하게 리다이렉트를 지원.
redirect:/basic/items/{itemId}" 컨트롤러에 매핑된 @PathVariable 의 값은 redirect 에서도 사용 가능.

redirect:/basic/items/{itemId} {itemId} 는 @PathVariable Long itemId 의 값을 그대로 사용.

editForm.html

<!DOCTYPE HTML>
<html xmlns:th="http://www.thymeleaf.org">
<head>
    <meta charset="utf-8">
    <link th:href="@{/css/bootstrap.min.css}"
          href="../css/bootstrap.min.css" rel="stylesheet">
    <style>
        .container {
            max-width: 560px;
        }
     </style>
</head>
<body>
<div class="container">
    <div class="py-5 text-center">
        <h2>상품 수정 폼</h2>
    </div>
    <form action="item.html" th:action method="post">
        <div>
            <label for="id">상품 ID</label>
            <input type="text" id="id" name="id" class="form-control" value="1" th:value="${item.id}" readonly>
        </div>
        <div>
            <label for="itemName">상품명</label>
            <input type="text" id="itemName" name="itemName" class="formcontrol" value="상품A" th:value="${item.itemName}">
        </div>
        <div>
            <label for="price">가격</label>
            <input type="text" id="price" name="price" class="form-control" value="10000" th:value="${item.price}">
        </div>
        <div>
            <label for="quantity">수량</label>
            <input type="text" id="quantity" name="quantity" class="formcontrol" value="10" th:value="${item.quantity}">
        </div>
        <hr class="my-4">
        <div class="row">
            <div class="col">
                <button class="w-100 btn btn-primary btn-lg" type="submit">저장</button>
            </div>
            <div class="col">
                <button class="w-100 btn btn-secondary btn-lg"
                        onclick="location.href='item.html'"
                        th:onclick="|location.href='@{/basic/items/{itemId}(itemId=${item.id})}'|"
                        type="button">취소</button>
            </div>
        </div>
    </form>
</div> <!-- /container -->
</body>
</html>

## PRG : Post / Redirect / Get

  • 상품 등록 처리 컨트롤러는 심각한 문제 존재. (addItemV1 ~ addItemV4, 상품 등록을 완료하고 웹 브라우저의 새로고침 버튼을 클릭 시 상품이 계속해서 중복 등록.)
  • 웹 브라우저 새로고침 : 마지막에 서버에 전송한 데이터를 다시 전송 (마지막 행위를 다시 실행(데이터 까지 포함하여))
  • 새로고침 해결방법 : 리다이렉트

BasicItemController : addItemV5 추가.

    @PostMapping("/add")
    public String addItemV5(Item item) {
        itemRepository.save(item);
//        model.addAttribute("item", item);     // 자동 추가, 생략 가능
        return "redirect:/basic/items/" + item.getId();
    }

주의할점

  • "redirect:/basic/items/" + item.getId() redirect에서 +item.getId() 처럼 URL에 변수를 더해서 사용하는 것은 URL 인코딩이 안되기 때문에 위험. RedirectAttributes 를 사용.

## RedirectAttributes

  • 상품 저장이 잘 되었으면 상품 상세 화면에 "저장되었습니다" 라는 메시지를 보여달라는 요구사항.

BasicItemController : addItemV6 추가

@PostMapping("/add")
public String addItemV6(Item item, RedirectAttributes redirectAttributes) {
    Item saveItem = itemRepository.save(item);
    redirectAttributes.addAttribute("itemId", saveItem.getId());
    redirectAttributes.addAttribute("status", true);
    return "redirect:/basic/items/{itemId}";
}

item.html 수정

<!-- 추가 -->
<h2 th:if="${param.status}" th:text="'저장 완료'"></h2>
  • th:if : 해당 조건이 참이면 실행
  • ${param.status} : 타임리프에서 쿼리 파라미터를 편리하게 조회하는 기능, 원래는 컨트롤러에서 모델에 직접 담고 값을 꺼내야 하는데, 쿼리 파라미터는 자주 사용해서 타임리프에서 직접 지원.

## 정리

  1. 프로젝트 생성.
  2. 타임리프 사용.
  3. @ModelAttribute
  4. 리다이렉트.
  5. PRG Post/ Redirect / Get 패턴 : 등록 시 리다이렉트 이용하여 중복등록 방지.
  6. RedirectAttributes
반응형
반응형

# 스프링 MVC 기본 기능

## 응답 - 정적 리소스, 뷰 템플릿

  • 스프링(서버)에서 응답 데이터를 만드는 방법은 크게 3가지이다.

1. 정적 리소스

  • 예) 웹 브라우저에 정적인 HTML, css, js을 제공할 때, 정적 리소스 사용.

2. 뷰 템플릿 사용

  • 예) 웹 브라우저에 동적인 HTML을 제공할 때, 뷰 템플릿 사용.

3. HTTP 메시지 사용

  • HTTP API를 제공하는 경우, HTML이 아니라 데이터를 전달해야 하므로, HTTP 메시지 바디에 JSON 같은 형식으로 데이터를 실어 보낸다.

정적 리소스

  • 스프링 부트는 클래스패스의 다음 디렉토리에 있는 정적 리소스를 제공 : /static, /public, /resources, /META-INF/resources
  • 정적 리소스 : 해당 파일을 변경 없이 그대로 서비스하는 것.

뷰 템플릿

  • 뷰 템플릿을 거쳐 HTML이 생성되고, 뷰가 응답을 만들어서 전달.
  • 일반적으로 HTML을 동적으로 생성하는 용도로 사용 하지만, 다른 것들도 가능. (뷰 템플릿이 만들 수 있는 것이라면 뭐든지 가능.)
  • 뷰 템플릿 경로 
src/main/resources/templates
  • hello.html (뷰 템플릿)
<!DOCTYPE html>
<html xmlns:th="http://www.thymeleaf.org">
<head>
    <meta charset="UTF-8">
    <title>Title</title>
</head>
<body>
<p th:text="${data}">empty</p>
</body>
</html>
  • ResponseViewController. (뷰 템플릿 사용을 위한 컨트롤러)
package hello.springmvc.basic.response;

import org.springframework.stereotype.Controller;
import org.springframework.web.bind.annotation.RequestMapping;
import org.springframework.web.servlet.ModelAndView;

@Controller
public class ResponseViewController {

    @RequestMapping("/response-view-v1")
    public ModelAndView responseViewV1() {
        ModelAndView mav = new ModelAndView("response/hello")
                .addObject("data", "hello!");
        return mav;
    }
}
  • String을 반환하는 경우 - View or HTTP 메시지
@RequestMapping("/response-view-v2")
public String responseViewV2(Model model) {
    model.addAttribute("data", "hello!");
    return "response/hello";
}
  • @ResponseBody 가 없으면 response/hello 로 뷰 리졸버가 실행되어 뷰를 찾고, 렌더링.
  • @ResponseBody 가 있으면 뷰 리졸버를 실행하지 않고, HTTP 메시지 바디에 직접 response/hello 라는 문자 입력.
  • Void를 반환하는 경우 - 해당 방식은 명시성이 떨어지고 이렇게 딱 맞는 경우도 없어서, 권장하지 않는다.
@RequestMapping("/response/hello")
public void responseViewV3(Model model) {
    model.addAttribute("data", "hello!");
}

Thymeleaf 스프링 부트 설정

  • 다음 라이브러리를 추가 (build.gradle에 추가)
implementation 'org.springframework.boot:spring-boot-starter-thymeleaf'
  • 스프링 부트가 자동으로 ThymeleafViewResolver 와 필요한 스프링 빈들을 등록. 그리고 아래 설정도 사용. (기본 값)
  • application.properties
spring.thymeleaf.prefix=classpath:/templates/
spring.thymeleaf.suffix=.html

## HTTP 응답 - HTTP API, 메시지 바디에 직접 입력

  • HTTP API를 제공하는 경우, HTML이 아닌 데이터를 전달해야 하므로, HTTP 메시지 바디에 JSON 같은 형식으로 데이터를 실어 보낸다.

ResponseBodyController.

package hello.springmvc.basic.response;

import hello.springmvc.basic.HelloData;
import lombok.extern.slf4j.Slf4j;
import org.springframework.http.HttpStatus;
import org.springframework.http.ResponseEntity;
import org.springframework.stereotype.Controller;
import org.springframework.web.bind.annotation.GetMapping;
import org.springframework.web.bind.annotation.ResponseBody;
import org.springframework.web.bind.annotation.ResponseStatus;

import javax.servlet.http.HttpServletResponse;
import java.io.IOException;

@Slf4j
@Controller
public class ResponseBodyController {

    @GetMapping("/response-body-string-v1")
    public void responseBodyV1(HttpServletResponse response) throws IOException {
        response.getWriter().write("OK");
    }

    @GetMapping("/response-body-string-v2")
    public ResponseEntity<String> responseBodyV2() {
        return new ResponseEntity<>("OK", HttpStatus.OK);
    }

    @ResponseBody
    @GetMapping("/response-body-string-v3")
    public String responseBodyV3() {
        return "OK";
    }

    @GetMapping("/response-body-json-v1")
    public ResponseEntity<HelloData> responseBodyJsonV1() {
        HelloData helloData = new HelloData();
        helloData.setUsername("userA");
        helloData.setAge(25);
        return new ResponseEntity<>(helloData, HttpStatus.OK);
    }

    @ResponseStatus(HttpStatus.OK)
    @GetMapping("/response-body-json-v2")
    public HelloData responseBodyJsonV2() {
        HelloData helloData = new HelloData();
        helloData.setUsername("userA");
        helloData.setAge(25);
        return helloData;
    }
}

responseBodyJsonV1

  • ResponseEntity 를 반환. HTTP 메시지 컨버터를 통해 JSON 형식으로 변환되어서 반환.

responseBodyJsonV2

  • ResponseEntity 는 HTTP 응답 코드를 설정할 수 있는데, @ResponseBody 를 사용하면 설정하기 까다롭다.
  • @ResponseStatus(HttpStatus.OK) 애노테이션 : 응답 코드 설정할 수 있는 애노테이션. 물론 애노테이션이기 때문에 응답 코드를 동적으로 변경할 수는 없다. (프로그램 조건에 따라 동적으로 변경하려면 ResponseEntity 사용.)

@RestController (@Controller + @ResponseBody)

  • @Controller 대신 @RestController 애노테이션을 사용하면, 해당 컨트롤러에 모두 @ResponseBody 가 적용되는 효과.
  • 따라서 뷰 템플릿을 사용하는 것이 아닌, HTTP 메시지 바디에 직접 데이터를 입력한다.
  • 이름 그대로 Rest API(HTTP API)를 만들 때 사용하는 컨트롤러.
  • @ResponseBody 는 클래스 레벨에 두면 전체에 메서드에 적용, @RestController 에노테이션 안에 @ResponseBody 가 적용되어 있다.

## HTTP 메시지 컨버터

  • 뷰 템플릿으로 HTML을 생성해서 응답하는 것이 아닌, HTTP API처럼 JSON 데이터를 HTTP 메시지 바디에서 직접 읽거나 쓰는 경우 HTTP 메시지 컨버터를 사용하면 편리하다.

스프링 MVC는 다음의 경우 HTTP 메시지 컨버터를 적용.

  • HTTP 요청 : @RequestBody , HttpEntity(RequestEntity)
  • HTTP 응답 : @ResponseBody , HttpEntity(ResponseEntity)

HTTP 메시지 컨버터 인터페이스

org.springframework.http.converter.HttpMessageConverter
/*
 * Copyright 2002-2021 the original author or authors.
 *
 * Licensed under the Apache License, Version 2.0 (the "License");
 * you may not use this file except in compliance with the License.
 * You may obtain a copy of the License at
 *
 *      https://www.apache.org/licenses/LICENSE-2.0
 *
 * Unless required by applicable law or agreed to in writing, software
 * distributed under the License is distributed on an "AS IS" BASIS,
 * WITHOUT WARRANTIES OR CONDITIONS OF ANY KIND, either express or implied.
 * See the License for the specific language governing permissions and
 * limitations under the License.
 */

package org.springframework.http.converter;

import java.io.IOException;
import java.util.Collections;
import java.util.List;

import org.springframework.http.HttpInputMessage;
import org.springframework.http.HttpOutputMessage;
import org.springframework.http.MediaType;
import org.springframework.lang.Nullable;

/**
 * Strategy interface for converting from and to HTTP requests and responses.
 *
 * @author Arjen Poutsma
 * @author Juergen Hoeller
 * @author Rossen Stoyanchev
 * @since 3.0
 * @param <T> the converted object type
 */
public interface HttpMessageConverter<T> {

   /**
    * Indicates whether the given class can be read by this converter.
    * @param clazz the class to test for readability
    * @param mediaType the media type to read (can be {@code null} if not specified);
    * typically the value of a {@code Content-Type} header.
    * @return {@code true} if readable; {@code false} otherwise
    */
   boolean canRead(Class<?> clazz, @Nullable MediaType mediaType);

   /**
    * Indicates whether the given class can be written by this converter.
    * @param clazz the class to test for writability
    * @param mediaType the media type to write (can be {@code null} if not specified);
    * typically the value of an {@code Accept} header.
    * @return {@code true} if writable; {@code false} otherwise
    */
   boolean canWrite(Class<?> clazz, @Nullable MediaType mediaType);

   /**
    * Return the list of media types supported by this converter. The list may
    * not apply to every possible target element type and calls to this method
    * should typically be guarded via {@link #canWrite(Class, MediaType)
    * canWrite(clazz, null}. The list may also exclude MIME types supported
    * only for a specific class. Alternatively, use
    * {@link #getSupportedMediaTypes(Class)} for a more precise list.
    * @return the list of supported media types
    */
   List<MediaType> getSupportedMediaTypes();

   /**
    * Return the list of media types supported by this converter for the given
    * class. The list may differ from {@link #getSupportedMediaTypes()} if the
    * converter does not support the given Class or if it supports it only for
    * a subset of media types.
    * @param clazz the type of class to check
    * @return the list of media types supported for the given class
    * @since 5.3.4
    */
   default List<MediaType> getSupportedMediaTypes(Class<?> clazz) {
      return (canRead(clazz, null) || canWrite(clazz, null) ?
            getSupportedMediaTypes() : Collections.emptyList());
   }

   /**
    * Read an object of the given type from the given input message, and returns it.
    * @param clazz the type of object to return. This type must have previously been passed to the
    * {@link #canRead canRead} method of this interface, which must have returned {@code true}.
    * @param inputMessage the HTTP input message to read from
    * @return the converted object
    * @throws IOException in case of I/O errors
    * @throws HttpMessageNotReadableException in case of conversion errors
    */
   T read(Class<? extends T> clazz, HttpInputMessage inputMessage)
         throws IOException, HttpMessageNotReadableException;

   /**
    * Write an given object to the given output message.
    * @param t the object to write to the output message. The type of this object must have previously been
    * passed to the {@link #canWrite canWrite} method of this interface, which must have returned {@code true}.
    * @param contentType the content type to use when writing. May be {@code null} to indicate that the
    * default content type of the converter must be used. If not {@code null}, this media type must have
    * previously been passed to the {@link #canWrite canWrite} method of this interface, which must have
    * returned {@code true}.
    * @param outputMessage the message to write to
    * @throws IOException in case of I/O errors
    * @throws HttpMessageNotWritableException in case of conversion errors
    */
   void write(T t, @Nullable MediaType contentType, HttpOutputMessage outputMessage)
         throws IOException, HttpMessageNotWritableException;

}
  • HTTP 메시지 컨버터는 HTTP 요청, HTTP 응답 둘 다 사용.
canRead() , canWrite() : 메시지 컨버터가 해당 클래스, 미디어타입을 지원하는지 체크.

read() , write() : 메시지 컨버터를 통해서 메시지를 읽고 쓰는 기능.

스프링 부트 기본 메시지 컨버터 (일부 생략)

0 = ByteArrayHttpMessageConverter

1 = StringHttpMessageConverter

2 = MappingJackson2HttpMessageConverter

주요한 메시지 컨버터

  • ByteArrayHttpMessageConverter : byte[] 데이터 처리.
클래스 타입: byte[] , 미디어타입: */*
요청 예) @RequestBody byte[] data
응답 예) @ResponseBody return byte[] 쓰기 미디어타입 application/octet-stream
  • StringHttpMessageConverter : String 문자로 데이터를 처리한다
클래스 타입: String , 미디어타입: */*
요청 예) @RequestBody String data
응답 예) @ResponseBody return "ok" 쓰기 미디어타입 text/plain
  • MappingJackson2HttpMessageConverter : application/json
클래스 타입: 객체 또는 HashMap , 미디어타입 application/json 관련
요청 예) @RequestBody HelloData data
응답 예) @ResponseBody return helloData 쓰기 미디어타입 application/json 관련

HTTP 요청 데이터 읽기

HTTP 요청이 오고, 컨트롤러에서 @RequestBody , HttpEntity 파라미터를 사용한다.

메시지 컨버터가 메시지를 읽을 수 있는지 확인하기 위해 canRead() 호출.

대상 클래스 타입을 지원하는가 : 예) @RequestBody 의 대상 클래스 ( byte[] , String , HelloData )

HTTP 요청의 Content-Type 미디어 타입을 지원하는가 : 예) text/plain , application/json , */*

canRead() 조건을 만족하면 read() 를 호출해서 객체 생성하고, 반환.

HTTP 응답 데이터 생성

컨트롤러에서 @ResponseBody , HttpEntity 로 값 반환.

메시지 컨버터가 메시지를 쓸 수 있는지 확인하기 위해 canWrite() 를 호출.

대상 클래스 타입을 지원하는가 : 예) return의 대상 클래스 ( byte[] , String , HelloData )

HTTP 요청의 Accept 미디어 타입을 지원하는가(정확히는 @RequestMapping 의 produces) : 예) text/plain , application/json , */*

canWrite() 조건을 만족하면 write() 를 호출해서 HTTP 응답 메시지 바디에 데이터를 생성.

## 요청 매핑 헨들러 어뎁터 구조 (RequestMappingHandlerAdapter)

  • @RequestMapping 을 처리하는 핸들러 어댑터인 RequestMappingHandlerAdapter (요청 매핑 헨들러 어뎁터)

ArgumentResolver (파라미터 처리!)

  • 애노테이션 기반의 컨트롤러는 매우 다양한 파라미터를 사용. HttpServletRequest , Model 은 물론이고, @RequestParam , @ModelAttribute 같은 애노테이션 그리고 @RequestBody , HttpEntity 같은 HTTP 메시지를 처리하는 부분까지 큰 유연함을 보여주었다.
  • 이렇게 파라미터를 유연하게 처리할 수 있는 이유가 바로 ArgumentResolver 덕분.
  • 애노테이션 기반 컨트롤러를 처리하는 RequestMappingHandlerAdaptor 는 바로 이 ArgumentResolver 를 호출해 컨트롤러(핸들러)가 필요로 하는 다양한 파라미터의 값(객체)을 생성. 그리고 파리미터의 값이 모두 준비되면 컨트롤러를 호출하면서 값을 넘겨준다.
  • 스프링은 30개가 넘는 ArgumentResolver 를 기본으로 제공. (HandlerMethodArgumentResolver 인데 줄여서 ArgumentResolver 라고 부른다)
/*
 * Copyright 2002-2014 the original author or authors.
 *
 * Licensed under the Apache License, Version 2.0 (the "License");
 * you may not use this file except in compliance with the License.
 * You may obtain a copy of the License at
 *
 *      https://www.apache.org/licenses/LICENSE-2.0
 *
 * Unless required by applicable law or agreed to in writing, software
 * distributed under the License is distributed on an "AS IS" BASIS,
 * WITHOUT WARRANTIES OR CONDITIONS OF ANY KIND, either express or implied.
 * See the License for the specific language governing permissions and
 * limitations under the License.
 */

package org.springframework.web.method.support;

import org.springframework.core.MethodParameter;
import org.springframework.lang.Nullable;
import org.springframework.web.bind.WebDataBinder;
import org.springframework.web.bind.support.WebDataBinderFactory;
import org.springframework.web.context.request.NativeWebRequest;

/**
 * Strategy interface for resolving method parameters into argument values in
 * the context of a given request.
 *
 * @author Arjen Poutsma
 * @since 3.1
 * @see HandlerMethodReturnValueHandler
 */
public interface HandlerMethodArgumentResolver {

   /**
    * Whether the given {@linkplain MethodParameter method parameter} is
    * supported by this resolver.
    * @param parameter the method parameter to check
    * @return {@code true} if this resolver supports the supplied parameter;
    * {@code false} otherwise
    */
   boolean supportsParameter(MethodParameter parameter);

   /**
    * Resolves a method parameter into an argument value from a given request.
    * A {@link ModelAndViewContainer} provides access to the model for the
    * request. A {@link WebDataBinderFactory} provides a way to create
    * a {@link WebDataBinder} instance when needed for data binding and
    * type conversion purposes.
    * @param parameter the method parameter to resolve. This parameter must
    * have previously been passed to {@link #supportsParameter} which must
    * have returned {@code true}.
    * @param mavContainer the ModelAndViewContainer for the current request
    * @param webRequest the current request
    * @param binderFactory a factory for creating {@link WebDataBinder} instances
    * @return the resolved argument value, or {@code null} if not resolvable
    * @throws Exception in case of errors with the preparation of argument values
    */
   @Nullable
   Object resolveArgument(MethodParameter parameter, @Nullable ModelAndViewContainer mavContainer,
         NativeWebRequest webRequest, @Nullable WebDataBinderFactory binderFactory) throws Exception;

}


  • 동작방식 : ArgumentResolver 의 supportsParameter() 를 호출 해당 파라미터를 지원하는지 체크, 지원하면 resolveArgument() 를 호출해서 실제 객체를 생성. 그리고 이렇게 생성된 객체가 컨트롤러 호출 시 넘어간다.

ReturnValueHandler

  • HandlerMethodReturnValueHandler 를 줄여 ReturnValueHandle 라고 부른다.
  • ArgumentResolver 와 비슷한데, 이것은 응답 값을 변환하고 처리.
  • 컨트롤러에서 String으로 뷰 이름을 반환해도, 동작하는 이유가 바로 ReturnValueHandler 덕분이다.
  • 스프링은 10여개가 넘는 ReturnValueHandler 를 지원. (ModelAndView , @ResponseBody , HttpEntity , String 등)

HTTP 메시지 컨버터

  • HTTP 메시지 컨버터를 사용하는 @RequestBody 도 컨트롤러가 필요로 하는 파라미터의 값에 사용.
  • @ResponseBody 도 컨트롤러의 반환 값을 이용.
  • ArgumentResolver은 HTTP 메서지 컨버터 사용. 

요청

  • @RequestBody 를 처리하는 ArgumentResolver, HttpEntity 를 처리하는 ArgumentResolver 가 존재.
  • 이 ArgumentResolver 들이 HTTP 메시지 컨버터를 사용해서 필요한 객체를 생성하는 것.

응답

  • @ResponseBody 와 HttpEntity 를 처리하는 ReturnValueHandler 가 존재. 그리고 여기에서 HTTP 메시지 컨버터를 호출해서 응답 결과를 만든다.
  • 스프링 MVC는 @RequestBody @ResponseBody 가 있으면 RequestResponseBodyMethodProcessor (ArgumentResolver), HttpEntity 가 있으면 HttpEntityMethodProcessor (ArgumentResolver)를 사용.

확장

  • 스프링은 다음을 모두 인터페이스로 제공. (필요하면 언제든 기능 확장가능.)
  • HandlerMethodArgumentResolver
  • HandlerMethodReturnValueHandler
  • HttpMessageConverter
  • 기능 확장 : WebMvcConfigurer 를 상속 받아 스프링 빈으로 등록하면 된다.
반응형

+ Recent posts