반응형
# JSON API 활용 (네이버 클라우드 플랫폼 지도 API 서비스 등록)
- 네이버, 구글, 다음 등 위도와 경도 관련 서비스를 해주는 다양한 오픈 API 존재.
## 네이버 클라우드 플랫폼 지도 API 서비스 등록
1. 회원가입
- 오픈 API 사용 위해 회원가입 및 키 발급 필요.
- 회원 가입 및 결제 수단 등록 진행.
- https://www.ncloud.com/?language=ko-KR
NAVER CLOUD PLATFORM
cloud computing services for corporations, IaaS, PaaS, SaaS, with Global region and Security Technology Certification
www.ncloud.com
2. 네이버 지도 API 서비스 사용을 위한 등록방법
- 우측 상단 콘솔 클릭.

- Service > AI NAVER API 선택.

- Application 등록 버튼 클릭.

- Application 이름 설정.

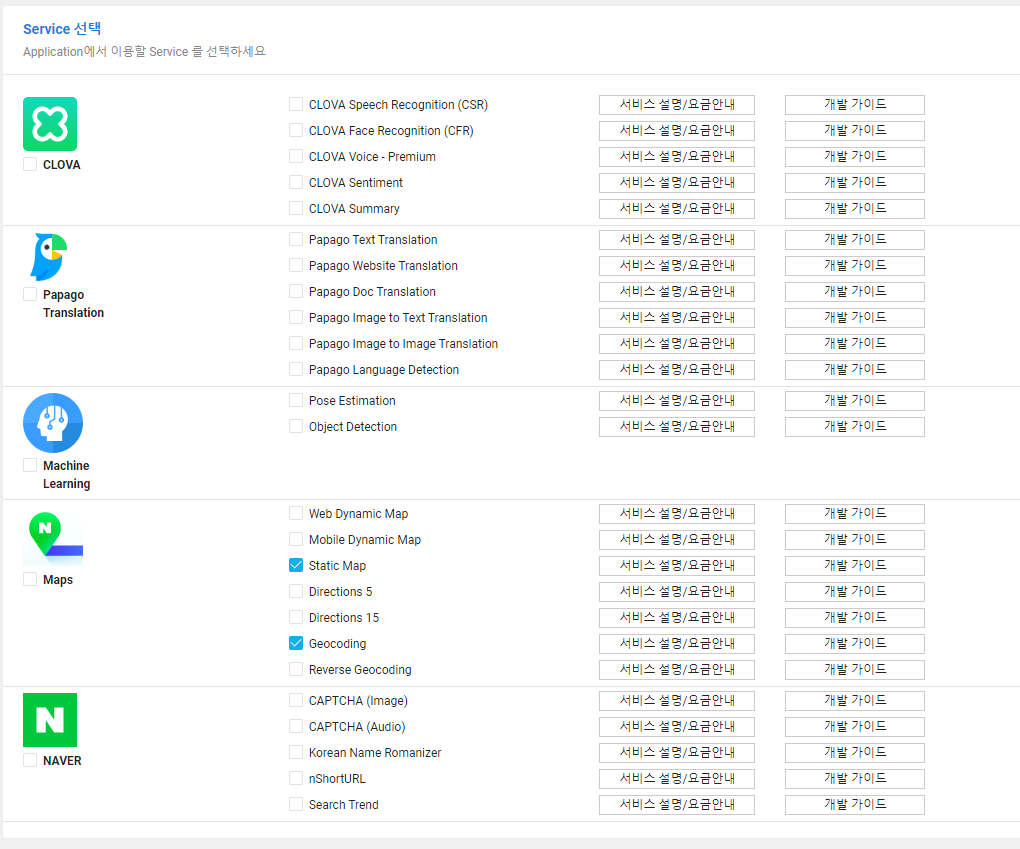
- 사용하고자 하는 서비스 선택

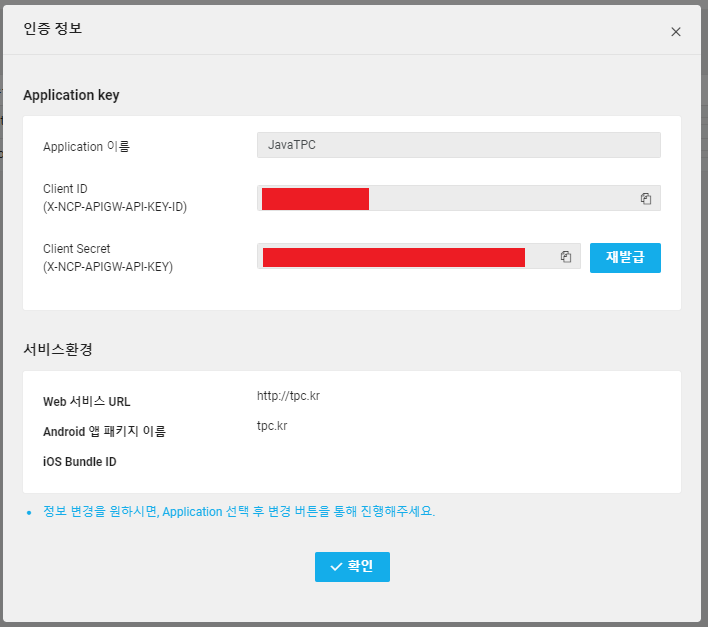
- 서비스 환경 등록 관련 정보 입력. (별도로 정해진게 없어도 임의로 등록, 추후 변경)

- 등록 완료 후 아래 화면에서 인증정보 버튼 클릭하여 정보 확인.


## 네이버 클라우드 플랫폼 지도 API 활용 (위도, 경도 추출)
1. Geocoding OpenAPI
- 등록한 서비스 관련 가이드 확인하여
- Geocoding : 주소의 텍스트를 입력받아 좌표를포함한 상세정보를 제공.
- https://api.ncloud-docs.com/docs/ai-naver-mapsgeocoding
Geocoding 개요 - Geocoding
api.ncloud-docs.com
2. 구현 (Geocoding OpenAPI 사용)
import java.io.BufferedReader;
import java.io.InputStreamReader;
import java.net.HttpURLConnection;
import java.net.URL;
import java.net.URLEncoder;

import org.json.JSONArray;
import org.json.JSONObject;
import org.json.JSONTokener;
import org.json.simple.parser.JSONParser;

public class Project01_D {
	public static void main(String[] args) {
		// 주소 입력 -> 위도, 경도 좌표 추출.
		BufferedReader io = new BufferedReader(new InputStreamReader(System.in));
		String clientId = "등록한 네이버 지도 API 인증정보 중 clientId 입력";
		String clientSecret = "등록한 네이버 지도 API 인증정보 중 clientSecret 입력";

		try {
			System.out.println("주소를 입력해주세요 : ");

			String address = io.readLine();
			String addr = URLEncoder.encode(address, "UTF-8");

			// Geocoding 개요에 나와있는 API URL 입력.
			String apiURL = "https://naveropenapi.apigw.ntruss.com/map-geocode/v2/geocode?query=" + addr;	// JSON

			URL url = new URL(apiURL);
			HttpURLConnection con = (HttpURLConnection) url.openConnection();
			con.setRequestMethod("GET");

			// Geocoding 개요에 나와있는 요청 헤더 입력.
			con.setRequestProperty("X-NCP-APIGW-API-KEY-ID", clientId);
			con.setRequestProperty("X-NCP-APIGW-API-KEY", clientSecret);

			// 요청 결과 확인. 정상 호출인 경우 200
			int responseCode = con.getResponseCode();

			BufferedReader br;

			if (responseCode == 200) {
				br = new BufferedReader(new InputStreamReader(con.getInputStream(), "UTF-8"));
			} else {
				br = new BufferedReader(new InputStreamReader(con.getErrorStream()));
			}

			String inputLine;

			StringBuffer response = new StringBuffer();

			while((inputLine = br.readLine()) != null) {
				response.append(inputLine);
			}

			br.close();

			JSONTokener tokener = new JSONTokener(response.toString());
			JSONObject object = new JSONObject(tokener);
			JSONArray arr = object.getJSONArray("addresses");

			for (int i = 0; i < arr.length(); i++) {
				JSONObject temp = (JSONObject) arr.get(i);
				System.out.println("address : " + temp.get("roadAddress"));
				System.out.println("jibunAddress : " + temp.get("jibunAddress"));
				System.out.println("위도 : " + temp.get("y"));
				System.out.println("경도 : " + temp.get("x"));
			}

			// JSON.simple 사용한 경우 아래와 같이 진행.
			/*JSONParser jpr = new JSONParser();
			JSONObject jarr = (JSONObject) jpr.parse(response.toString());
			JSONArray arr2 = (JSONArray) jarr.get("addresses");

			for (int i = 0; i < arr2.length(); i++) {
				JSONObject temp = (JSONObject) arr.get(i);
				System.out.println("address : " + temp.get("roadAddress"));
				System.out.println("jibunAddress : " + temp.get("jibunAddress"));
				System.out.println("위도 : " + temp.get("y"));
				System.out.println("경도 : " + temp.get("x"));
			}*/

		} catch (Exception  e) {
			System.out.println(e);
		}
	}
}
반응형
'인프런 강의 학습 > Java TPC 실전' 카테고리의 다른 글
| API활용_네이버 지도 API(지도 GUI 생성) (0) | 2022.06.18 |
|---|---|
| API 활용_네이버 지도 API (지도 이미지 생성_Static Map API 사용) (0) | 2022.06.16 |
| API 활용_JSON-Java API (JSONObject, JSONArray, JSONTokener, InputStream) (0) | 2022.06.14 |
| API 활용_JSON API (Gson, org.json) (0) | 2022.06.08 |
| API 활용_JSON, Gson 이론 (0) | 2022.06.07 |